LinkedIn Tutorial Update [New Features of 2018]

![LinkedIn Tutorial Update [New Features of 2018]](https://writology.com/wp-content/uploads/2018/09/7923280978_e06c9d5532_b_1.jpg)
LinkedIn is the largest and most recognized professional network with more than 433 millions users from 200 countries all over the world. This is a place where recruiters hang out, headhunting world’s brightest minds. This is also where companies connect with other businesses, look for partners, and promote their products or services.
Whether you are looking for a job or simply want to grow professionally, everything starts from registering on LinkedIn and setting up a profile. In this article we answer some of the most common LinkedIn questions and provide you with some tips and tricks on how to make your profile look more professional.
How to create a LinkedIn profile?
In order to join LinkedIn, just fill out a form on LinkedIn homepage https://www.linkedin.com/.
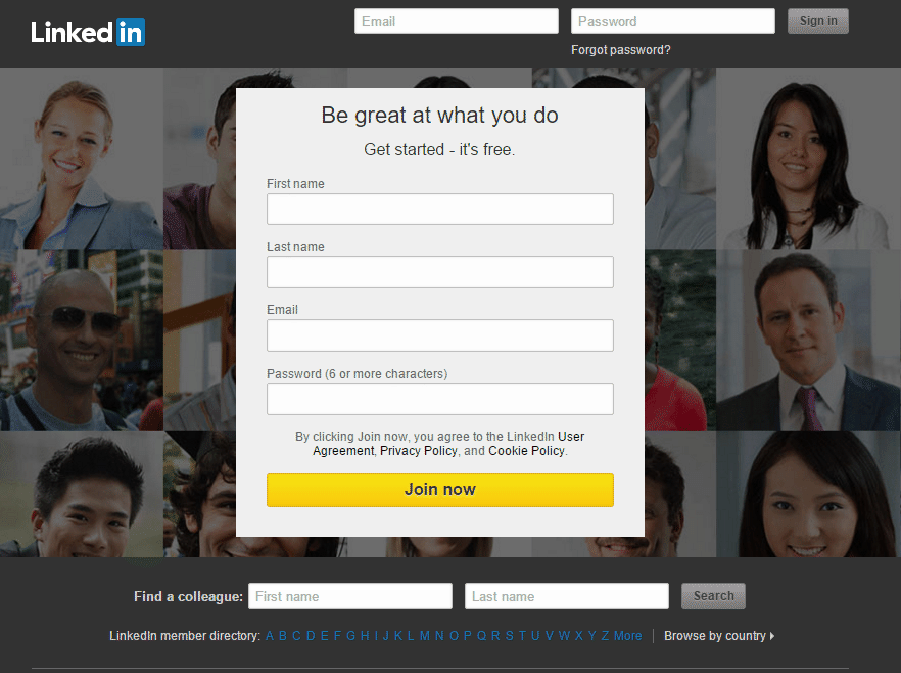
Later you’ll be asked to add a picture, tell about your education, professional experience, skills, achievements, etc. It may look like a simple resume at first glance, but LinkedIn also allows adding documents, videos, images, and publications – anything that adds to your qualifications and professionalism.
How to delete a LinkedIn profile?
Prior to deleting your LinkedIn profile, note that closing an account means losing all the data and connections you’ve managed to make. Fortunately, you have 20 days after closing to reopen your profile, but LinkedIn guys won’t be able to recover your incoming invitations, followings, endorsements, and group memberships.
In case you still want to delete a profile, follow this instruction.
1. Point the cursor at the “Me” icon at the top right corner of the page.
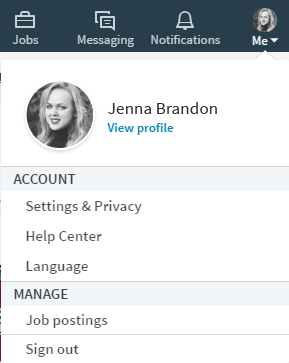
2. Click on Settings&Privacy.
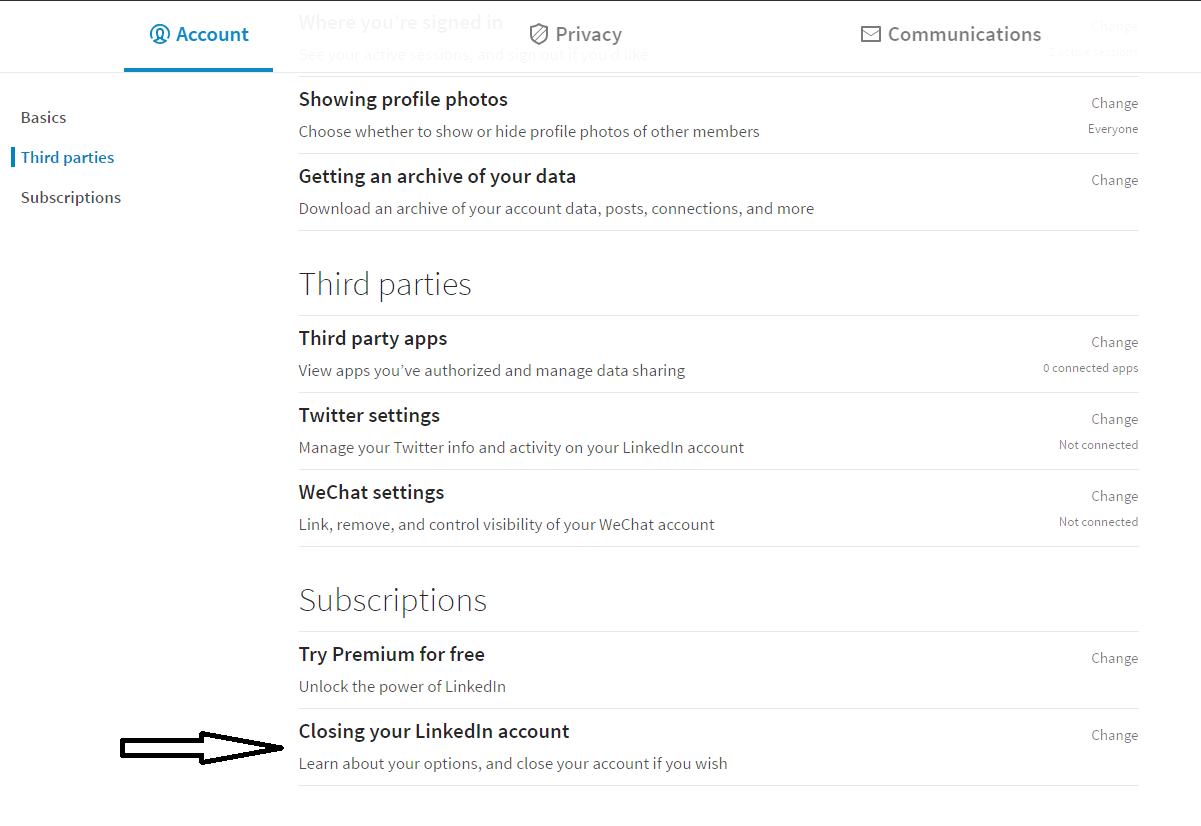
3. Scroll down to the end of the page and click on Closing your LinkedIn account.
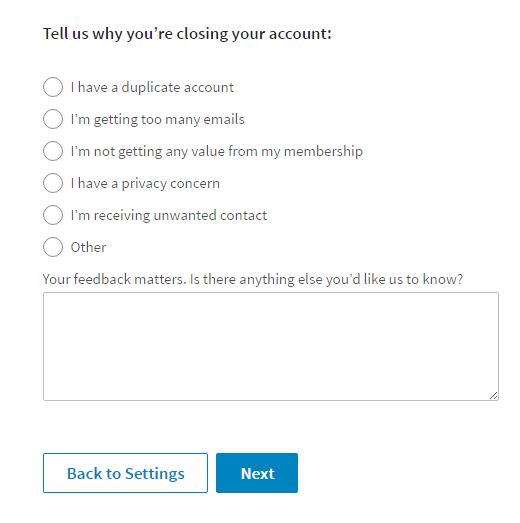
4. LinkedIn will tell you they are sorry you’re leaving and ask you to think again. You need to choose the reason for closing and click Next.
5. Then enter your password one last time and click on Close account.
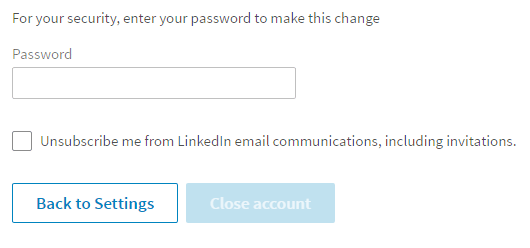
This is how you deactivate your LinkedIn profile.
What is my LinkedIn URL?
Your LinkedIn URL (LinkedIn address, LinkedIn ID) is, undoubtedly, important. Simply put, your LinkedIn ID is simply a link to your LinkedIn profile. This is what you put on a business card and include in your email signature.
It was extremely easy to find your LinkedIn URL prior to a big design change. It used to be displayed right under your profile box:
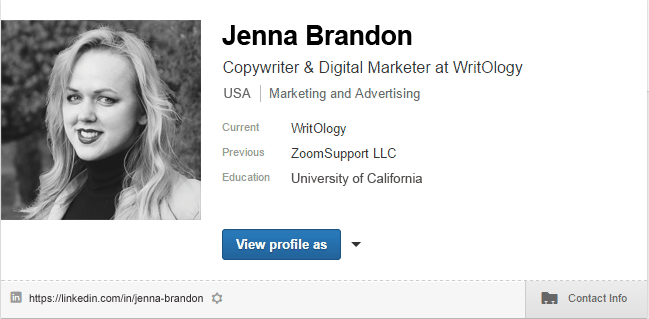
Now it is a little bit more complicated to find, but the idea didn’t change. You can copy it from the address line of your browser. Simply hit Me at the right top corner, choose View Profile and the link you get will be your LinkedIn URL.
How to change your LinkedIn URL?
Of course it is advisable to customize your LinkedIn ID, as it doesn’t look pretty by default. Your default URL is usually a crazy combination of random letters and numbers. This is not what you want to put on a business card or resume, as it does not even remotely look professional or impressive.
Therefore, edit your LinkedIn URL in order to make it shorter and better-looking.
In order to change your LinkedIn profile ID, click on “Me” icon on top of the page and choose “View Profile”.
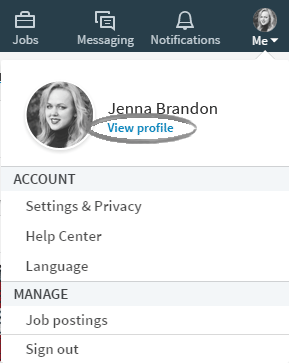
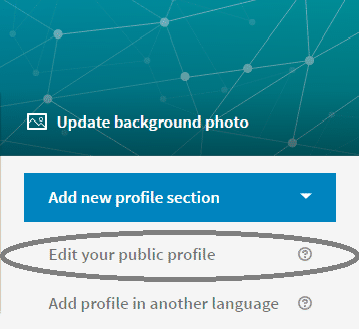
After that, click on “Edit your public profile” button that will appear in the right corner.
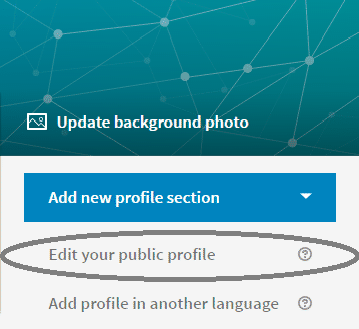
By clicking on the pen icon you can edit your LinkedIn ID.
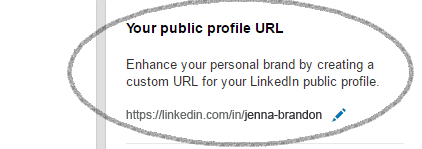
Note that you can change your LinkedIn URL up to 5 times within 180 days.
How to turn your LinkedIn profile into a PDF resume?
Yes, you can actually save your LinkedIn profile as a nice CV in PDF format! You can either print it afterwards or send to potential employers via email. Isn’t that cool?
In order to do it, go to your profile page and click on the icon with three dots. Next simply choose “Save to PDF”.
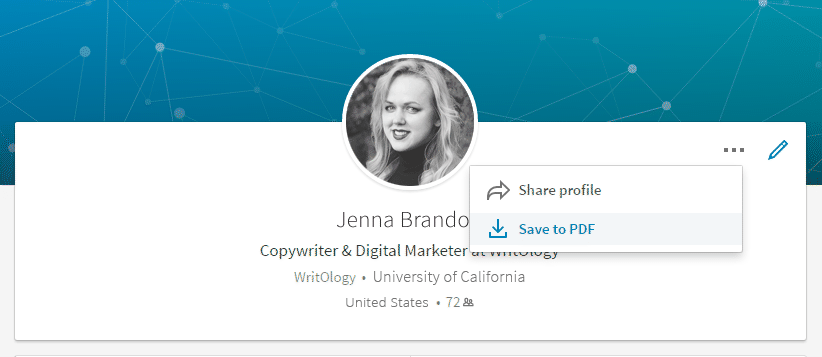
Congrats, your CV is saved! Just open your downloaded resume and enjoy.
How to add a great LinkedIn photo?
Adding or changing a photo in LinkedIn is, in fact, easy. You can upload a picture from your phone or computer simply by clicking on your current photo on your profile page.
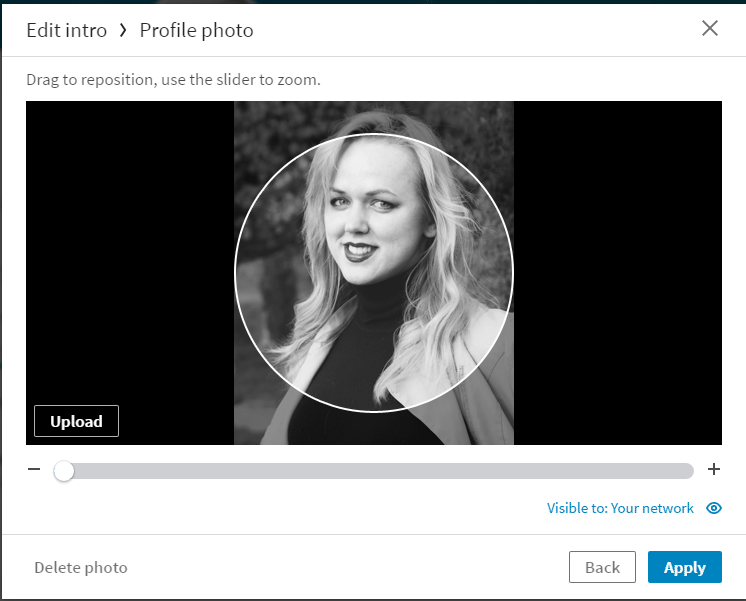
Just remember that your LinkedIn profile picture should not exceed 8 MB and 20,000 pixels in size. You can only add square photos in JPG, GIF, or PNG formats.
Uploading a photo is not a challenging task. What is challenging is choosing the picture that would deliver the right message and create a nice first impression. What does a great LinkedIn profile picture look like? Here are several tips from us.
- It should be a real up-to-date picture of you. LinkedIn can remove a photo if there’s your dog, Batman, or Coca Cola logo on it. Do it 3 times and you’ll never be able to upload a picture again.
- It’s better to choose a photo with no distracting background or other people on it. A LinkedIn profile pic is small, so a simple headshot with just your face and shoulders will look the most beneficial. No friends, no kids, no pets, no picture of you doing yoga (unless you’re a yoga instructor).
- Obviously, a picture should look professional. Keep photos of you at a bar or chilling near the pool for Instagram.
- Professional doesn’t mean grumpy. Serious or angry face would rather scare away than ignite a desire to get in touch. Find a pic where you look healthy, relaxed, and friendly.
- No selfies, period.
Lasly, do not make a common mistake and choose a default LinkedIn silhouette as your profile pic. Profile with pictures get viewed 14 times more (at least this is what LinkedIn guys say).
How to add the best background image?
This feature used to be available for premium members only, but now everyone can benefit from this opportunity to make his/her profile unique and even more appealing. What you need to do is simply click on Update background photo on your profile page and upload a picture.
Remember that it should be 1400×425 pixels in size and a part of it will be covered by an actual profile page (middle part, in fact). Apart from that, images tend to expand or shrink, so end result is often a surprise. Unfortunately, there’s no “draft background”, so everything you do will be immediately seen by other users.
What about the design? We recommend adding photos that reflect your personality or brand philosophy and leave a positive aftertaste.
If you are a travel blogger, a stunning view of Machu Picchu would be a good fit. A make-up artist could choose a picture of two dancing make-up brushes, and a programmer – computer screen with smart-looking symbols on it. Remember that your background image and your profile pic often tell more about you than you think, so make sure they deliver the right message.
What is a LinkedIn summary and how to write a good one?
LinkedIn summary is a place where you can tell your story. It is considered to be one of the most important profile elements, as it has powers to impress, seduce, and excite. You can use these 2000 characters to talk about your background, accomplishments, and passions – everything that makes you unique and special.
In order to include a summary, click on the pen icon on your profile page.
It will open a window where you can edit your profile information. Feel free to scroll down and type your summary in a corresponding box.
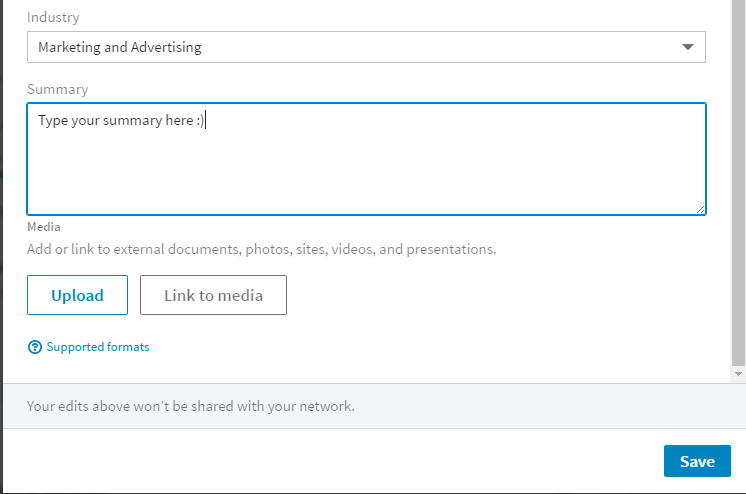
Once you’re done, click on Save.
Now what do you write in that box? This is a question that is not so easy to answer in brief, but we will do our best to help you.
First of all, you should decide whether you want to write your summary from the first person or from the third person. First-person format is, undoubtedly, more intimate and telling, but many people find it hard to write about their own achievements in the first person without seeming arrogant and boastful. A third-person summary does not touch that much, but you can also make it shine by putting on your creative thinking cap and writing something out of the ordinary.
Here’s a recommended summary structure from us:
- A “wow” introductory sentence. We want the big bosses to keep on reading, right? Therefore, start with something funny, attention-grabbing, or even shocking. It can be a question, a thought-provoking quote, or just a strong statement. Anything that describes your inner self.
- The body. Here you can include: a little history, education, your professional achievements, skills, certificates, recommendations, hobbies, etc. Do not forget to back everything with numbers and figures and remember that you can add videos, documents, and pictures.
- Final words where you let people know how to get in touch with you and why they need to do it.
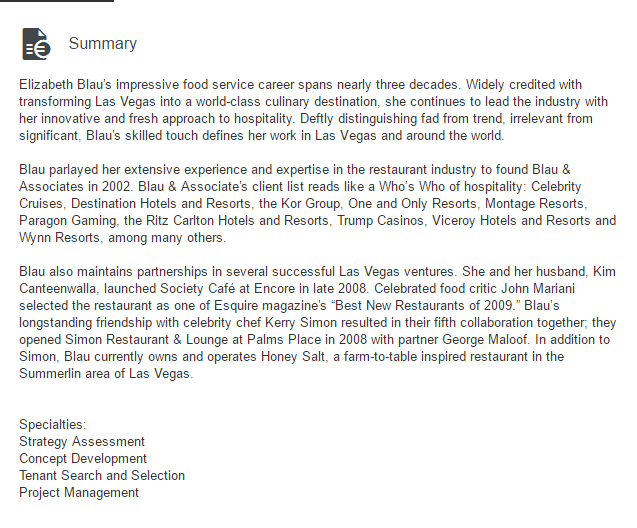
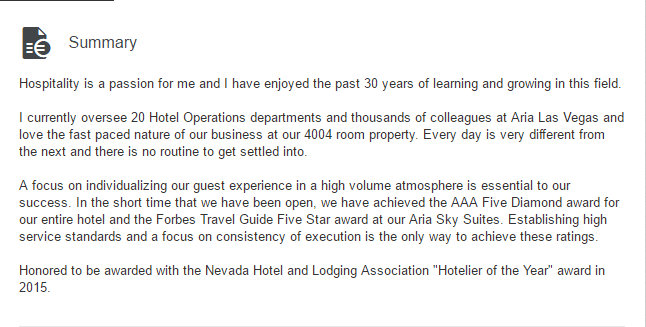
Now let’s stop beating around and the bush and take a look at some really good LinkedIn summary examples.
Third-person summary:
First-person summary:
What is a LinkedIn professional headline and how to write a good one?
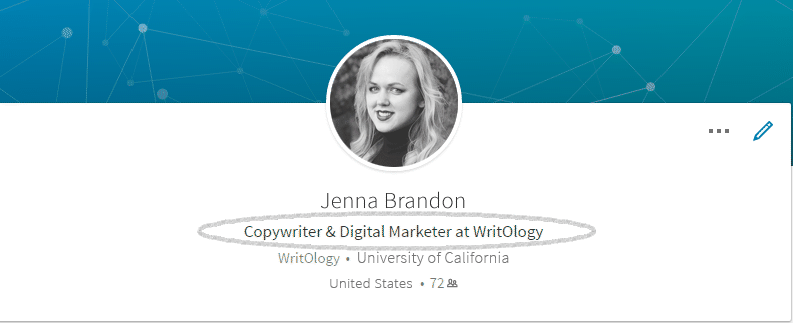
A professional headline is the first thing that LinkedIn users see when they visit your page. It is what appears right under your name and it consists of 120 characters max.

Default LinkedIn headline is a boring combination of your current job title and a name of the company you work at. If you want to stand out from the crowd, consider customizing it.
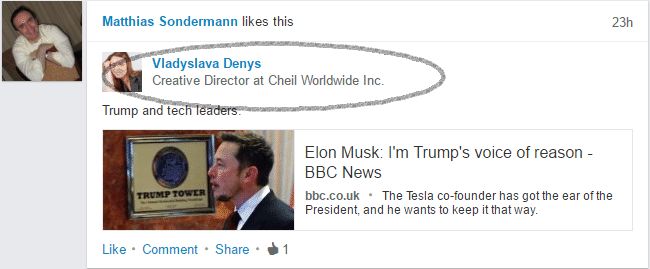
In order to edit your professional headline, click on the pen icon again and simply type in new headline.

Do not forget to click Save once you’re done.
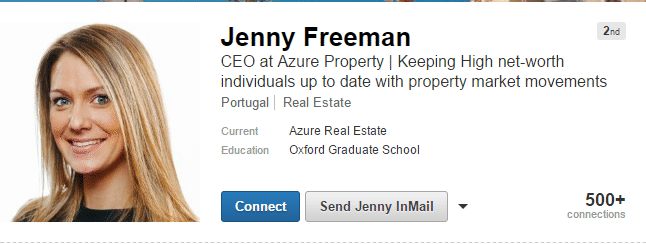
If you want your LinkedIn headline to ignite a desire to connect with you, do not simply tell who you are and what you specialize in. Surprisingly, writing a LinkedIn headline is a lot like writing good copy – it’s not about you, it’s about them. Though it is, undoubtedly, important to name your position (it helps your potential employers or clients learn if you are a specialist they are looking for), focus on how others can benefit from working with you.
Basically, a formula for it looks like this: [your position or qualification – a keyword] who [what can you do for your clients].
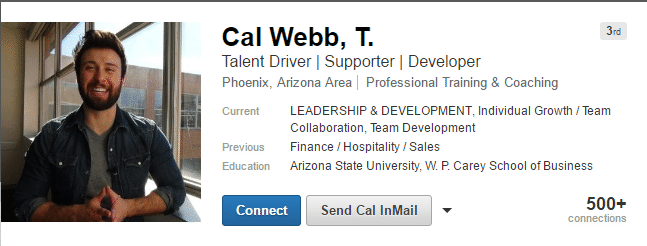
A couple of good examples:
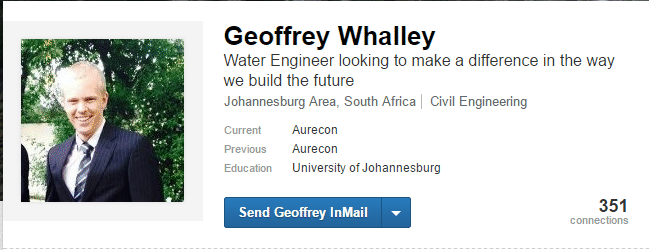
Also, a little humor is never a bad marketing tactic. Would you click through to learn more about this guy from a headline like this? We would!
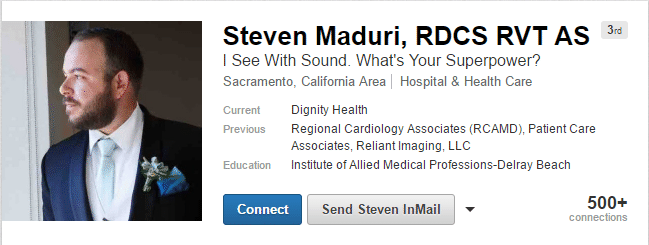
Also, we recommend to use periods, commas, dashes, or vertical bars to separate phrases and make a headline more readable. However, use them in moderation.
What is LinkedIn profile strength and why do I need to improve it?
Depending on how much information you’ve added to your profile, there are 5 types of Profile strengths.
- All-Star
- Expert
- Advanced
- Intermediate
- Beginner
In simple words, the more complete your profile is, the “stronger” is its status. In fact, you have no problem connecting with people even if you’re a “Beginner” or “Intermediate”. Employers and clients, however, are 40 times more likely to notice you if you have an “All-Star” status.
How to improve your LinkedIn profile and make it shine like a star?
1. Add a photo and a background image.
2. Write a compelling headline.
3. Craft an enticing summary.
4. Add at least 3 of your previous positions, describe your duties and achievements.
5. Fill in “Education” field.
6. List at least 3 skills and collect some endorsements.
7. Connect with at least 50 people.
8. Add extra information about yourself (like where you went to school, volunteering experience, languages, etc).
And, of course, in order to get your awesome All-Star profile seen by others, check your visibility settings and make sure your profile is not hidden. Don’t know how to do it? Read on.
How do I hide my LinkedIn public profile?
When people search for you on Google, they are most likely to come across your LinkedIn profile. Regular Google users who are not signed into LinkedIn will see a public version of your profile, which is a little different from what you see on a regular basis. For example, they won’t see your background image, personal info (like marital status or birthday), recommendations, and media samples.
Being on Google is definitely a good thing, but if you want to remove your profile from search engines and become accessible only for registered LinkedIn members, you can make it happen.
In order to do it, click on an already familiar “Edit your public profile” button.
In Customize Your Public Profile section choose Make my public profile visible to no one and click on Save.
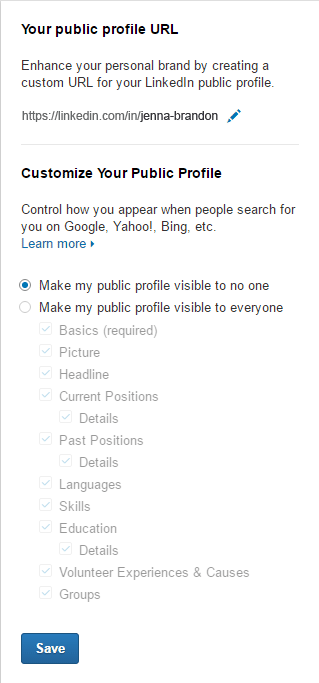
Then wait till your profile is deleted from search engines (it may take a while, by the way).
In case you want to make it visible again, choose Make my public profile visible to everyone. As you may have noticed, you have complete control over what kind of information is displayed to others. By unchecking “Picture” or “Headline” you make those sections unavailable to Google users.
How to look at someone’s Linkedin profile anonymously?
LinkedIn is a social network that does not disclose information about profile views. If someone got interested in your account and visited your profile, you immediately get notified by email. Apart from that, information is displayed in Notifications section on top of the page:
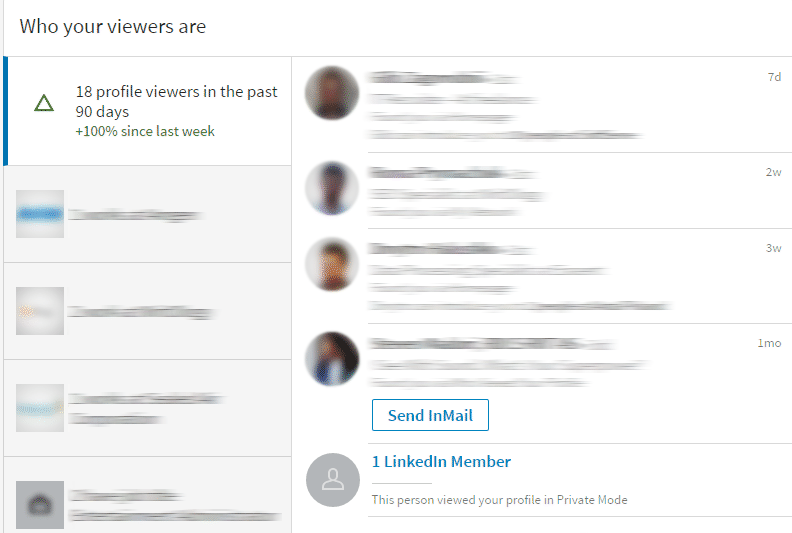
Even if you viewed someone’s profile on LinkedIn accidentally, this person will know about it. If you don’t want to be seen in the list of visitors for some reason, you can view LinkedIn profiles anonymously. In that case users will still receive a notification about a profile view, but they will not know who exactly did it. All they will know is that you are a LinkedIn member who chose to go anonymous.
In order to view LinkedIn profiles in private mode, follow this instruction.
1. Click on “Me” icon at the top right corner of the page. This will open a menu that looks like this:
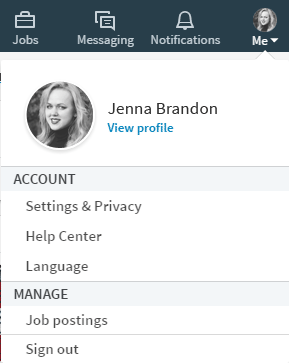
2. Click on Settings & Privacy.
3. Click on Privacy tab.
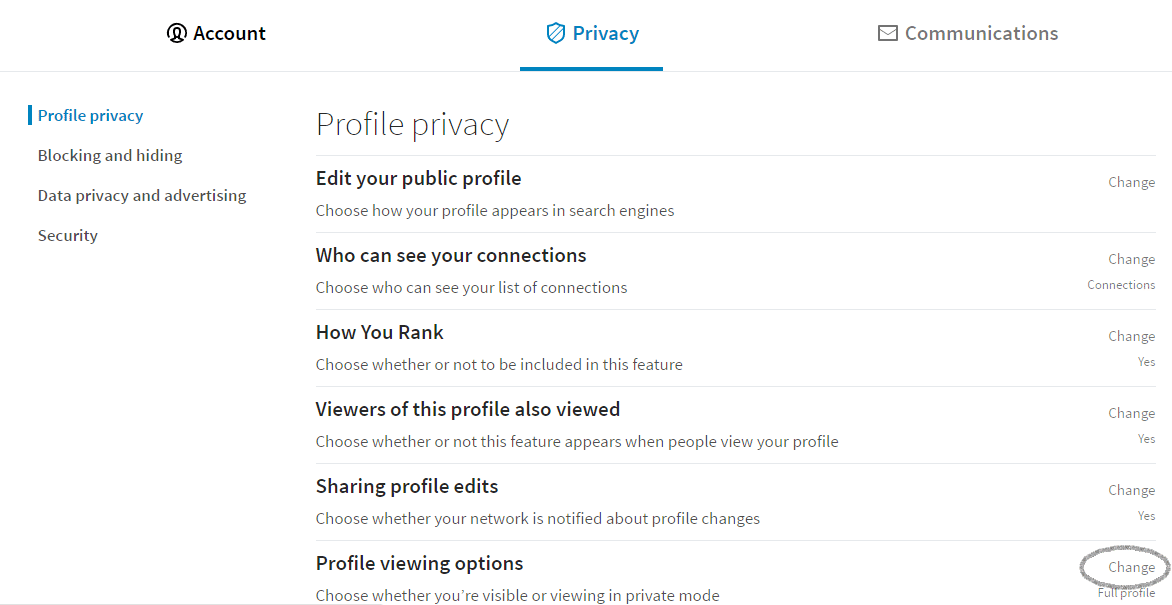
4. You need Profile viewing options. Click on Change.
5. Now you have three options to choose from.
- Your name and headline. This is a default mode, and it means that LinkedIn users will see all the information about you and will be able to access your profile.
- Private profile characteristics. LinkedIn users will not see your photo or name, they will only know the industry you’re from. This is generally known as semi-private mode.
- Private mode. No information about you will be displayed and nobody will even be able to click the profile icon. You’ll go totally anonymous. However, make sure to not view profiles that you previously viewed while being in a private mode multiple times. When you do this, all your previous anonymous footprints will change back to normal.
It is important to know that once the second or the third option is chosen, you lose the possibility to get notified about your own profile views, so it is wise to use those options only when necessary and than switch back to the normal mode.
You can also view LinkedIn profiles without signing in. Simply type in the person’s name in Google, and in case this LinkedIn member did not hide his/her public profile, you’ll see all the info about this user (with several exceptions discussed above).
How to Block Someone on LinkedIn (And Unblock Immediately)
Why block people on LinkedIn? If someone looks like a spammer or a fake identity, invasively tries to convince you to work with them or make investments, bothers people in your contact list or says overall insane things – you surely don’t want such users to ruin your LinkedIn experience.
How to block someone on LinkedIn?
1. Go to the user’s profile.
2. Click the button as shown below and select Block/Report from the drop-down menu.
3. Options are to either block or report the user. You’ll be given a short piece of information – twice, to make sure you really want to do this – stating that after you block the user, you and them will no longer be connected, see each other’s profiles, have the joy of exchanging messages, and take glee in each other’s updates. And no more suggestions for interaction between you two!
By the way, you can block 250 people max on LinkedIn. Who would ever hold that many grudges is a whole different question.
How to unblock someone if you’ve blocked them by mistake (or was it a weird prank on your colleague?), and you want to fix it?
1. Click the Me button on the shortcut bar at the top and select Settings & Privacy from the drop-down menu.
2. Move to the tab Privacy and click “Blocking and hiding” on the left.
3. Click Change on the right to Blocking.
4. You’ll see the names of the users you’ve blocked, and you need to press Unblock next to that one bird you want to release.
5. To unblock a member, you need to enter your password – in case somebody else could be messing with your profile. At this point, LinkedIn will tell you that you cannot reblock the member again within 48 hours – in case you change your mind.
All Filters On: Pro Search on LinkedIn
LinkedIn search engine offers a wide range of filters that help you conduct effective search with minimum effort. Firstly, search results are available in six categories: People, Jobs, Content, Companies, Groups, and Schools. If your search request is more general, there’s always the All category. The switch between categories as well as some major filters are all located at the top of the search page for easy access.
For the advanced search in the most important categories, People and Jobs, click “All filters” on the bar.
Now, to all filters in each of the two categories:
1. Jobs.
Here you can choose how long ago your desired job was posted, its type (full-time to volunteer), and the level of experience you have. There are also special LinkedIn filters – you can narrow your search down to the jobs of the people in your network and vacancies that are easy to apply to or have a small number of applicants. In the following groups of filters, you can add your own: location, company, industry, and job function (the exact kind of occupation the job should engage you in).
2. People.
Besides searching for professionals by their job title, company, and school, and aside from looking for a specific person by their name and location, you can go even further. Whether you’re desperately seeking Susan, your old pal from college, or looking for potential employees and network buddies, it makes it easier to include as much information as LinkedIn makes it possible into your search request. You know ten companies where Susan worked? Great, add them to “Past companies”. You want to find connections from all graphic design workplaces you know? Terrific, add them to “Current companies”. Same goes for such filter groups as Industries, Schools, Profile language, and Nonprofit interests. On top of that, you can search by the rank of connection: look within your existing network, the connections of your connections, or farther. Or, you can simply write the name of a specific connection of yours to look among their connections.
Stickers and Text: Let Your LinkedIn Voice Be Heard
Stickers and Text are the new funky additions to the videos you can record and share with fellow LinkedIn users. The video function is available in the LinkedIn mobile app, which goes beyond opportunities presented in a PC browser and gives the platform an even greater sense of community. If you haven’t discovered it yet, now is always the perfect time, because videos present a great chance to be more personal and expressive when you want to share an idea, give someone a hearty LinkedIn recommendation, or even launch a professional campaign.
The styles of text and the collection of stickers update every now and then. With a text, you can describe in a line or two what your video is about, you can write a slogan or a hashtag for it – and you can do that just as well with stickers, which also may simply jazz up your video and add a character to it, prompting others to connect with it on some level. If you are new to the app, the videos, or just these features, here are some simple steps to follow.
1. Whenever you scroll up in the app, a navigation bar appears. When you pick home screen, it has an icon for making a post on your page.
2. When in the post writing mode, pick the video function at the bottom.
3. When your video has been recorded, you can choose to insert a sticker.
4. Picking a sticker or a text for your video is just a matter of a tap on one of the icons.
Voice Messages Now on LinkedIn: Embrace the Advantage
Exchanging voice messages is another handy function available only in the LinkedIn app. It has self-evident advantages over usual texts and calls, which can be very helpful in professional communication. Voice messages save your time: speaking is obviously faster than typing, and on busy days, even a little time is too precious to lose. They also save you from embarrassing auto corrections and typos. Formulating a written message properly is also harder than simply speaking out your mind, and so, voice messages give you greater freedom of self-expression. Moreover, voice messages took the best from texts as well: they’re more convenient than calls, beсause they allow interlocutors think over their responses before they have to answer. All of this is perfect for planning meetings, discussing projects, and pretty much anything you have to talk “work” about, especially when on the move.
How to use voice messages on LinkedIn?
1. In your app, tap the My Network icon on the navigation bar at the bottom.
2. Go to “View connections”.
3. Tap the message icon next to the contact you want to send a voice message to.
4. Tap the microphone icon to record your message.
5. What’s left are clear instructions:
Translations on LinkedIn: Watch the Barriers Disappear
LinkedIn has enabled a long-awaited function of translating foreign posts in the feed to a user’s language. It seems like each virtual community increasingly goes global every day, and LinkedIn is far from exception: the work market is booming now more than ever thanks to the worldwide interconnection, that’s why it’s so important to leave out the barriers, including language ones. Not being limited in that way presents users with more career opportunities and resources for professional growth.
It’s very easy to access a translation. There is a See translation feature under most of the posts in foreign languages.
What language is foreign for you is determined automatically through the data received mainly from your profile’s language settings and your location. As LinkedIn officially informs, over 60 languages are available for translation. The function is currently active only in the mobile app, and it doesn’t spread on absolutely all content – for example, you can’t translate shared posts, comments, and job descriptions, but the developers never stop improving LinkedIn’s functionality.
The Magical QR Code Goes to LinkedIn
The QR code, short for “quick response”, can be fairly called the king of the digital world, if not the emperor. As easily as it gets, it allows people to conduct such operations as finding locations and making payments in one swift moment. In LinkedIn, a QR code leads you directly to the page of your new or potential work acquaintance where you can connect with them, bypassing the risk of confusing their phone number or forgetting their business card at a conference (thus losing a chance for a fruitful collaboration).
How to use this feature?
1. In your LinkedIn app, tap the QR icon at the search bar.
2. There are two ways to apply someone’s QR code: scan it directly or upload an image of the code.
3. Besides letting your acquaintance scan your own code, you can share it through social media or send somebody a downloaded image of it.
LinkedIn also encourages users to put their code on all materials, physical and digital, that give information about their work: CVs, company ads, business cards and booklets etc, for thus the word about their professional service can spread faster and effortlessly – talk about building a successful alliance network! With LinkedIn’s new QR feature, it’s all just one tap away. Well, maybe two taps.
Commute Duration: Your Time, Your Decision
Wouldn’t it be nice to be able to calculate commute time before you take a new job, as opposed to discovering an unpleasant surprise of a long journey to work, with a complex route, when you’re already hired and there’s no way back (no last resort way, at least)? LinkedIn thinks so too, and therefore they’ve made your wish come true and launched a commuting time map. However, your opportunity to make such a calculation depends on the company that offers the job: whether they have specified their address or not. If they have, you will see it when you:
1. Open a job description on your mobile device.
2. Scroll down just a bit and check if the address of the company is specified.
3. If it is, you can set your own address to look at the route from home to work on the map and see how long it takes to get there by car, public transport, and on foot at a specific time of day.
4. When you tap on the job location on the map, you’ll be directed to Google Maps, where you can look at the public transport routes in more detail.
Currently, the developers roll out the function of setting your commute preferences on your profile.
Final words
There’s still so much to talk about, but this article is already too long, so obviously it’s time to stop. Hopefully, we gave you answers to some of the most common LinkedIn questions. Feel free to ask more in the comments down below. We’ll be more than happy to assist you!
If you ever face difficulties crafting a powerful LinkedIn profile, know that various LinkedIn profile writing services are always there to help. Here at WritOlogy we have expert LinkedIn profile writers who are especially trained to write outstanding summaries or professional headlines.